Installation
APC closures can be installed on pail covers by manual or automated processes. Our simple, rugged tooling enables start-up manual installation while our partners can facilitate fully automatic production.
Lock Ring Closures
Installation Method
APC-1 and APC-2 series closures use a tight interference fit plus an outer lock ring to secure the closure to the pail cover after it is molded. Once the cover opening is aligned over the closure, installation is completed in one fluid step with two distinct stages:
- The top press forces the beaded rim of the pail cover into the channel of the flexible body skirt, while the bottom air piston pushes up against the closure cap.
- The greater force of the top press pushes down the bottom air piston. The plastic cap lock ring breaks away from the cap bails and is pushed into place around the flexible body skirt.
This unique two-stage installation reduces force on the beaded rim, allowing installation on warm molded covers.
Manual Installation Press
Manual installation presses for APC-1 and APC-2 closures are available for purchase from APC Products Ltd.
With the addition of adapter plates, these presses may also be used for the APC-3 and APC-4L.
Please contact us for more details or to place an order.

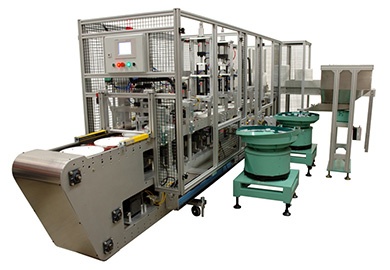
Automatic Installation
Martin Automated Systems has created automatic installation lid lines for APC-2 and APC-6. These systems can significantly speed the installation process and reduce labour costs.
For more information, please visit www.martin-auto.com
Insert Molded Closures
Installation Method
APC-7 insert molded closures use a plastic-to-plastic bond to secure the closure to the pail cover. The closures are loaded into the cover mold just before injection molding takes place. Installation steps include:
- Closures are fed through a hopper and track for orientation at a pick-up point
- Robotic end-of-arm tooling (EOAT) grips the closure cap by suction, lifts and orients the closure for installation
- A 3-axis robot loads the closure into the cover mold core side
- The robot retracts and the mold closes, clamping the closure for molding
- Plastic for the cover is injected into the mold and flows around the body skirt of the closure
The plastic-to-plastic bond that is formed through this process gives a leak-tight attachment that is impossible to break without detection.
Automatic Installation
APC-7 insert molded closures are installed using a fully automated process. They have been successfully integrated with 1 and 2 cavity cover molds as well as 4 cavity stack molds. There are four key tooling components for successful automatic installation:
- Cover mold inserts
APC-7 insert molding can be built, tested and run by retrofitting an existing cover mold with custom machined core and cavity inserts. These Be-Cu inserts are low maintenance as there are no moving parts to wear. The inserts can be turned on a lathe, as there is no requirement for ovality. Where possible, inserts are easier to fit into a new mold at the design stage. Drawings are available from APC Products Ltd. and we can refer you to a toolmaker with knowledge of the APC-7. - Automated closure feeding
For single and double cavity molds, APC-7 closures can be fed by a simple hopper and a near vertical elevator with ribs. In our “Plastic Pail Flex Spout APC-7 Automatic Installation” video, the elevator for the APC-7 demonstration cell was supplied by Martin Automated Systems www.martin-auto.com
For single, double or stack molds, the APC-7 closure can be fed using a vibrating hopper and horizontal vibrating track. The feeder system featured in our APC-7 installation animation and “APC-7 Feeder Runoff” video, was supplied by Feed Rite Automation www.feedriteautomation.com - End-of-arm tooling
APC Products Ltd and Feed Rite Automation have collaborated on the design of APC-7 end-of-arm tooling (EOAT) that attaches to the robot arm and picks up each closure using suction. The EOAT featured in the APC-7 installation animation can also be ordered from Feed Rite Automation www.feedriteautomation.com - 3-axis robots
APC-7 insert molding can be tested and run on a single cavity by hand loading the closure and running the press on a semi-automatic cycle. Production insert molding requires a 3-axis robot to carry parts from the feeder to the mold. The robot needs to be sized to match the mold and molding machine. Cover stack molds will require a “dual Y axis” robot. Pail molders should choose a local robot supplier that they are familiar with. APC can also refer you to a robot supplier with knowledge of the APC-7.
For more information about tooling inserts and automation, please contact us.